Accessing the installation trunk by lifting the hull unit
To do a visual inspection of the inside surface of the installation trunk you need access.Access is also required to inspect and or replace the sacrificial anodes.This access can be achieved by lifting the entire hull unit up from the installation trunk.
The vessel is in dry dock. The ST90 system is turned off. The shipyard must provide all necessary tools and manpower. The following specific items are required for this task:
Torque wrench
A crane (or other lifting device) capable of lifting the entire hull unit
The lifting device must be rated to minimum twice the weight of the hull unit. An attachment point for the lifting device must be located directly above the hull unit.
Spare parts:
Rubber gasket (Part number )
The upper parts of the hull unit include the mechanical gantry, the hoist motor, the hoisting spindle and the Motor Control Unit. The transducer shaft is supported by the gantry, and penetrates the mounting flange. The transducer cable is placed inside the transducer shaft. The transducer is mounted to the bottom of the transducer shaft. The complete assembly is mounted on the top of the installation trunk.
The hull unit is heavy. Appropriate lifting equipment (lifting tackle, portable crane or ship’s crane) is required. You must always use appropriate lifting equipment to minimize risk of injury to personnel or damage to equipment. Only certified equipment must be used.
The upper parts of the hull unit include the mechanical gantry, the hoisting motor, the hoisting spindle and the junction box. The transducer shaft is supported by the gantry, and penetrates the mounting flange. The transducer cable is placed inside the transducer shaft. The transducer is mounted to the bottom of the transducer shaft. The complete assembly is mounted on the top of the installation trunk.
Procedure
- Make sure that the ST90 system is turned off.
- Preparations:
- Make sure that none of the cables prevent you from
lifting the hull unit.
Disconnect relevant cables.
- Fasten the lifting
tackle to the two lifting eye bolts on either side of the top of the
gantry.
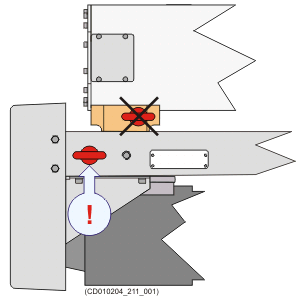 Note:
Note:Make sure that you use the correct lifting eyes! There are two lifting eyes on each side of the hull unit. One is located on the top of the gantry, and one on the top of the transducer shaft. Make sure that you use the lifting eyes on the gantry!
- Take up the slack.
- Make sure that none of the cables prevent you from
lifting the hull unit.
- Loosen and remove the bolts that secure the mounting flange to the top of the installation trunk.
- Lift the hull unit.
Make sure that you do not damage the delicate parts of the hull unit.
Note:Make sure that you do not damage the transducer or any of the cables. Watch the hull unit carefully during the lift to prevent the delicate parts from being damaged, stuck or hooked on to protruding objects.
- Remove the rubber gasket to protect it.
Note:
This gasket must not be damaged.
Mounting the hull unit on top of the installation trunk:
- Lift the hull unit and place it vertically over the installation trunk.
- Check the top of the
installation trunk.
- Make sure that the surface of the installation trunk is clean and free from grit or other damaging particles.
- Make sure that the top of the installation trunk has not been damaged, and that it is smooth and even without physical scratches or dents.
- Rubber gasket:
- Make sure that the gasket is undamaged without cracks or signs of wear.
- Make sure that the gasket is NOT covered with grease or lubricants.
- Place the gasket at its correct location.
Note:If you suspect that the gasket is damaged, replace it. If the gasket has been contaminated with dirt, grease or lubricants, it must be replaced.
- Lower the hull unit
carefully onto the installation trunk.
Important:
The transducer is covered with a thick red or black protective coating made of a special plastic type. The protective coating is a vital part of the transducer. It is very important that neither this coating nor the internal parts of the transducer are damaged during the handling, installation or cleaning.
- Align the mounting holes carefully.
- Mount and tighten the relevant nuts and bolts.
First, tighten all the nuts to finger tight. Then work alternately on opposite sides of the construction.
Use the following torque: 140 Nm