Visual Objects menu
The Visual Objects menu controls which graphical elements that are shown in the different views. These graphic elements include markers, vectors and targets that are tracked. The majority of the functions are "on/off" buttons to enable or disable these graphic elements in the various views.
How to open
Select Visual Objects to open the menu.

Visual Objects is located on the Display menu.
Description
The majority of the choices provided by this menu are self-explanatory. Only brief descriptions are provided.
Before you can change the settings related to a view, you must click inside the view to activate it. The changes you make are by default only valid for the active view. Several of the functions offer Apply to All. If you select Apply to All your setting is applied to all the views in the current presentation mode.
The choices in this menu depends on which view in the display presentation that is currently "active". The menu may therefore change from one view to another. The screen capture may not show you all the menu choices.
If you do not need to use the menu system, you can hide it. This allows more space for the echo presentation.

Use the Menu on the top bar to hide or show the menu. When the menu system is hidden, it appears temporarily on the left or right-hand side of the screen if you move the cursor to that position.
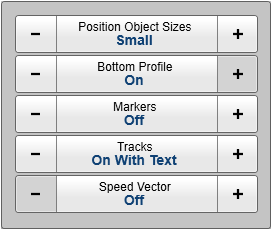
- Position Object Sizes
Select Place Marker to create a visual marker symbol at the cursor's current position. Each marker is shown as a small triangle with or without a short identifying label. When you start target or position tracking, a marker is used to identify the object. With this function you can increase or decrease the size of the markers.
Use this function to find the object sizes that fit your preferences. This may for example depend on your physical distance from the screen. The choice you make is saved with the user settings.
- Bottom Profile
For each ping transmitted for a vertical view, the ST90 system offers bottom detection functionality. This is an "on/off" switch. Set Bottom Profile to On to see a bottom contour in the current view. Select Apply to all if you wish to use the chosen setting in all the vertical views.
- Minute Markers
This is an "on/off" switch. In order to maintain a visual presentation of your vessel’s previous movements, you can draw these with a line. This line is drawn after the vessel symbol in the sonar views, and visualizes your past movements. We refer to this line as the History Line. The Minute Markers function adds markers to the history line. These markers indicate how far you have sailed in the last few minutes. The minute markers are shown as small circles on the history line.
- Markers
Select Place Marker to create a visual marker symbol at the cursor's current position. Each marker is shown as a small triangle with or without a short identifying label.
Position information from external objects such as buoys, fish aggregating devices and other similar items can be imported into the ST90 system. The external objects are shown as hexagonal markers in the echo presentation.
Use this function to control if and how the marker symbols are shown in the currently active view. Select Apply to all if you wish to use the chosen setting in all the views.
- Tracks
This is an "on/off" switch. When you start target or position tracking, a marker is used to identify the object. Each marker is shown as a small circle with or without a short identifying text. Use this function to control if and how the tracking markers are shown in the currently active view. Select Apply to all if you wish to use the chosen setting in all the views.
- Minute Markers Tracks
This is an "on/off" switch. When you start a target track, a dedicated marker is used to identify the object you are tracking. When enabled, Track History draws a position history line after each tracked target. The line identifies the previous positions of the target. This function adds markers to the track history. These indicate the target’s travelled distance for each minute.
- Track History
When you start a target track, a dedicated marker is used to identify the object you are tracking. Each marker is shown as a small circle with or without a short identifying text. In most cases, the target will move and continuously change its position relative to your own vessel. When enabled, Track History draws a position history line after each tracked target. The line identifies the previous positions of the target. This allows you to manually predict its current heading.
- Estimated Track Area
This is an "on/off" switch. To keep track of the targets you can use target markers and/or start target tracking. The tracked target is regarded as an object, and it is identified with a circle and two lines. When target tracking is activated, bearing and tilt are automatically adjusted to follow the movements of the tracked target. Relevant information about the tracked object can be found in the bottom left corner of the view. The information includes the location, speed, course and depth of the target, as well as an estimate of its area and volume. The area is provided in m2 while the volume is presented as weight in metric tons.
- Speed Vector
This is an "on/off" switch. Speed Vector shows you the predicted course and speed of the tracked target. The prediction is based on target’s current movements. The estimate is limited to one minute. The information is provided with a line indicating the target’s course. The length of the line reflects its speed.
- Bow Marker
This is an "on/off" switch. This function displays a dotted line drawn from the bow of the vessel symbol. The line reflects your vessel’s current heading. Do not confuse this line with the bearing line.
- Current Vector
This is an "on/off" switch. The Current Vector function shows you the speed and direction of the water current under your vessel. One or more arrow are drawn to or from the vessel symbol to indicate the properties of the sea currents. The direction of the arrows indicate the direction of the water currents. The length of the arrows reflects their speeds. Multiple arrows are used if the sensor presents information from more than one layer. A numerical readout of the current vector data is provided in the top right corner of the Horizontal view.
- Course Line
This function displays a dotted line drawn from the bow of the vessel symbol. The line reflects your vessel’s current course.
Open the button to select a time period. The Course Line function will predict your location after the chosen time period. The information is based on the inputs from the navigation sensors that are connected to the ST90 system.