Changing the tilt
In order to detect fish or schools in the water column you may need to change the angle of the sonar beams. The transmitted sonar beams can be tilted electronically.
The current tilt is shown with a solid line in the Vertical view. In the Horizontal view, the current settings for range, gain and tilt are shown in the top left corner of the view.
With 0° tilt the sonar beam is transmitted in parallel with the sea surface. With 60 degrees tilt the beam is directed towards the bottom.
The challenge is to find a tilt that prevents the fish echoes to be "buried" in reverberation and bottom echoes.
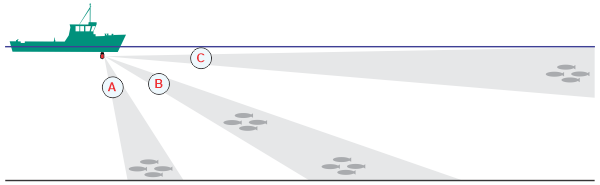
If you use a high tilt value (A) the fish are easily disguised by bottom echoes. A strong RCG (Reverberation Controlled Gain) setting will remove the bottom echoes. As the distance from the bottom to the fish increases, the fish echoes become clearer. However, this assumes that the fish echoes are considerably stronger than the bottom echoes.
If you use a very small tilt (C) you are not bothered by bottom echoes. However, if the sea surface is gusty you will see echoes from the waves. These echoes are normally rather weak, and they hardly move in relation to your vessel.
By means of a medium tilt angle (B) you are able to pick up scattered fish or schools if these are located at some distance above the bottom. The upper school in the illustration appears on the sonar picture before the bottom echo, while the lower school will easily be disguised by the bottom echoes. Once again you can activate the RCG function to improve the reading.
With the various beams provided by the ST90 system, it may be difficult to understand the concepts. How do these beams "behave" in the water? By means of a graphic presentation, the Beam Visualization dialog box attempts to give you a better understanding of how the acoustic beams are transmitted into the water. Open the Beam Visualization dialog box from the Setup menu.
Procedure
- In a Vertical view, click on the tilt line, keep the mouse button depressed, and drag the line up or down.
Optionally:
- Click in any view to
make it active.
The active view is identified with a thicker border. Unless you use the Apply to all function, all changes you make will only be applied to this view.
- Observe the Main menu.
Its default location is on the right side of the display presentation.
- Select Tilt.

- Make the necessary
adjustment.
The following methods can be used to adjust this setting:
- Select [+] or [-] to choose the requested setting.
- Place the cursor on the button. Press and hold the left mouse button. Move the cursor horizontally over the button. Release the mouse button when requested value is shown.
- Select the middle of the button to open it. If you have a keyboard connected to the ST90 system, type the requested value.
- Open the button and select Apply to all if you wish to use the chosen setting in all the views in the current presentation mode.