Lines page
The echo presentations in the Inspection views resemble the echograms you see on an echo sounder. The Lines page in the Echogram dialog box allows you to control the horizontal and vertical lines used in the echogram presentation. You can make the bottom easier to see, and add lines that hold additional information. The vertical scale of the echogram presentation can be changed. If you wish to add annotations to your echogram, these are enabled on this page.
How to open
This page is located in the Echogram dialog box. The Echogram dialog box is located on the Active menu. The dialog box is only available when an Inspection view is active.
Description
The settings on the Lines page are all related to visual appearance. The changes you make are by default only valid for the active Inspection view. Click in the Inspection view to activate it. The active view is identified with a thicker border.
Details
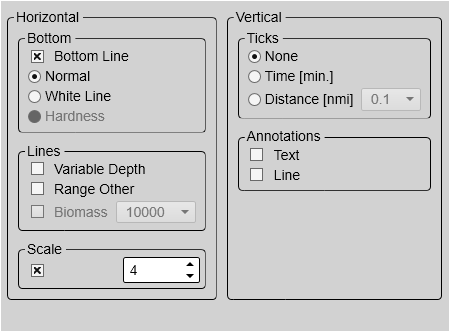
- Bottom
The bottom line can be switched off or on. You can enable a white line to enhance the bottom contour presentation.
- Bottom Line
This is an "on/off" switch. Select the box to enable the function. A bottom line can be added to your echogram to enhance the visual bottom detection. It appears as thin line that follows the bottom contour. The line is drawn in the current foreground colour.
- Normal
This is an "off" switch. The white line is disabled. The bottom line is drawn in the current foreground colour.
- White Line
This is an "on" switch. A white line can be added to your echogram to enhance the visual bottom detection. It appears as thick line in the current background colour (normally white) that follows the bottom contour. This line will not remove information, it will simply "push" the echo information further down in order to make the bottom easier to see. You can use the white and the bottom lines simultaneously. Select Normal to disable the line.
- Hardness
This is an "on" switch. The Hardness Line can be added to your echogram to retrieve additional information. It appears as thick colour coded line that follows the bottom contour. This line does not remove information, it simply "pushes" the echo information further down in order to show you the bottom reflectivity. You can use the Hardness Line and the Bottom Line functions simultaneously, but each can not be used together with the White Line. To disable the line, select None.
When you study the bottom hardness, you can learn more about the bottom. Certain species are known to prefer specific bottom conditions. With more knowledge, you are better qualified to estimate the possible catch.
Note:This is an optional function. In order to use this functionality, a dedicated software license is required. Contact you local dealer for more information.
- Lines
You can enable or disable one or more horizontal lines on the echogram.
- Variable Depth
This is an "on/off" switch. Select the box to enable the function. The Variable Depth Line can be added to your echogram to measure the depth. A horizontal line with a depth readout is placed in the echogram. To change the depth, select the line, keep the mouse button depressed, and move it up and down to place it at the requested position. This function is typically used to measure the water depth, the depth of a school, or even single fish.
- Range Other
This is an "on/off" switch. Select the box to enable the function. This function is used when you set up your ST90 system with both a surface related and bottom related echogram shown simultaneously. When enabled, two horizontal lines in the surface echogram indicate the range selected in the bottom echogram.
- Biomass
This function is not supported by the ST90 system.
- Scale
When enabled, equidistant horizontal scale lines are drawn inside the view in the current foreground colour; black during day and white during night. A maximum of 10 scale lines can be selected. No scale lines are drawn when the scale line count is set to 0 (zero).
- Vertical
These options control vertical markers and annotations.
- Ticks
This function places short vertical markers on the top of the echogram. These lines are used to measure time or distance.
None: No vertical markers are shown.
Time: A short vertical line is drawn in the upper part of the echogram once every minute.
Distance: A short vertical line is drawn in the upper part of the echogram once every specified number of nautical miles.
- Annotations
Select Text or Line to allow annotation markers to be shown. If you select Line, each text annotation is followed by a vertical line for improved visibility. Annotations can be typed in manually, set up for automatic generation, or imported from an external device.
Tip:Use the Annotations page to type comments and insert annotations into views. Several different annotation types may be added to the echograms or other views. The Annotations page is located in the Installation dialog box.
When you save raw data, the annotations you have defined are stored as annotation datagrams.