Objects menu
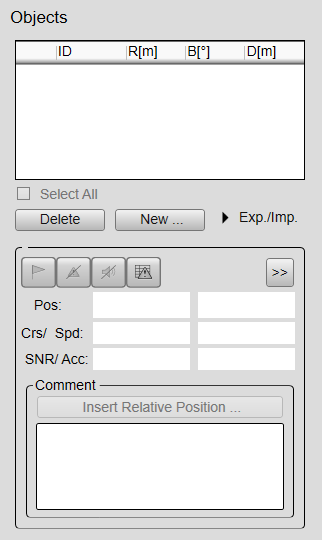
The Objects menu is - in spite of its name and location - not a menu at all. This "menu" opens a small view to monitor and control the objects you have defined in the sonar views. Each object is identified with a visual marker.
How to open
Select the Objects icon.

The icon is located under the Main menu. Select the icon one more time to close the menu.
Description
Once an echo has been provided with a marker in the display presentation it is regarded as an object. The Objects menu provides a list of all current objects. This includes all types of objects including those classified as targets.
In this context, the phrase marker is used to identify a visual symbol placed in the display presentation. A marker is thus a graphical indicator used to identify and highlight specific locations or objects. You can use markers to pinpoint and label interesting positions, objects or targets the ST90 system detects. Placing a marker on an echo identifies the echo as "interesting". It is regarded as an object that you can act upon.
If relevant, you can further classify the object as a target.
The phrase target is used to identify an echo in the display presentation that you wish to act upon. The echo may be from a material item, a shallow, reef or rock, or from fish, fish schools or mammals. You must decide which echoes that shall be classified as targets, and whether you shall start position or target tracking.
If you have placed markers on several echoes to make them objects, you can select one of these and give it priority status. The bearing line in the relevant views will automatically be locked on the object with this priority to reflects its bearing. You can only give priority status to one object. The priority is identified with a "P".
If you do not need to use the menu system, you can hide it. This allows more space for the echo presentation.

Use the Menu on the top bar to hide or show the menu. When the menu system is hidden, it appears temporarily on the left or right-hand side of the screen if you move the cursor to that position.
Details
- Objects
Once an echo has been provided with a marker in the display presentation it is regarded as an object. The table at the top of the Objects menu shows you all the objects that are currently identified with markers. Each marked object is listed with the following information:
- ID
The identifier (ID) offers a unique name for each object. Each marker is numbered sequentially.
Objects with allocated markers are identified with an "M" in the Objects menu. Objects that are subjected to target tracking are identified with a "T". You can give priority status to one marker to identify the relevant object as the most important target or position. The priority is identified with a "P".
- R
This value presents the range (in metres) from your vessel to the object you have identified with the marker.
- B
This value presents the true bearing of the object you have identified with the marker.
This value presents the object’s depth (in metres) relative to the sea surface.
Each marker is specified by its geographical position (latitude and longitude) and its depth. Additional information is provided for objects that are subjected to target tracking.
- Select All
Check Select All to select all the objects in the list.
- Delete
Select Delete to remove all the objects you have selected in the objects list. Each object is removed from the list and the ST90 presentation.
- New
Select New to add a new marker manually. The New Marker dialog box opens to accept the relevant information.
Use this functionality if you need to create a marker based on geographical information from an external source. You can place markers on for example wrecks, obstacles on the seabed or coral reefs. For each new marker you must provide:
- Longitude
- Latitude
- Depth
- Position Input Format
When the new marker is created, it is automatically assigned a unique identifier (UID) by the ST90 system.
- Export/Import
Once you have defined any number of objects, you can save them to a file on your hard disk. If necessary, you can retrieve the file later for reuse. The file format is XML. The file is located in the following folder:
c:\ProgramData\Simrad\ST90\Markers
- To External
This function is not supported by the ST90 system.
- To File
Select To File to save the currently selected objects to a file. The file name reflects the current date and time.
- From File
Select From File to retrieve the previously saved objects.
The Import Marker dialog box offers a list of files to choose from. Select a file from the list, then select OK to import it. If one or more of the markers already exist, you can overwrite, rename or cancel the operation.
- Control buttons
In the object list, select the object line to activate the control buttons for that particular object.
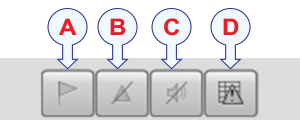
- (A) Priority
You can give priority status to one marker to identify the relevant object as the most important target or position. Select Priority to give the currently selected object a priority status. If another object has this priority, the status is automatically transferred to the new object. The priority is identified with a "P".
- (B) Disable Alarm
When you are tracking a moving target, certain target behaviour may trigger an alarm. Select Disable Alarm to disable any alarms for the currently selected tracked target.
- (C) Suppress Alarm Audio
You may hear an audio signal when tracking a moving target, and the target behaviour triggers an alarm. The sound is only provided if your Processor Unit is equipped with a loudspeaker. Select Suppress Alarm Audio to disable the audio.
Tip:The Messages dialog box also provides this functionality. Select Mute Message Sound to disable the audible signal.
- (D) Alarm History
All alarms, errors and warnings are listed in the Messages dialog box. Select Alarm History to open the Messages dialog box.
Tip:Select Messages on the top bar to open the dialog box.
- Object information
In the object list, select the object line to retrieve object information about that particular object. Some information is only available for an object that is subjected to target tracking.
- Position
Two fields present the geographical position of the currently selected object.
- Course/Speed
In the list of objects, select an object on which you have started target tracking. Two fields present the course and speed of the tracked target.
- SNR (Signal-to-Noise ratio)/Acceleration
In the list of objects, select an object on which you have started target tracking. One field presents the acceleration of the tracked target. The Signal-to-Noise ratio (SNR) gives the strength of the tracked target relative the noise floor defined by the reference cell in the CFAR filter.
- Comment
A text field at the bottom of the Objects menu allows you to type comments. You can only do this if you have computer keyboard connected to your Processor Unit.
- Insert Relative Position
Select Insert Relative Position to insert object information into the comment field. The information is inserted as a text string that contains the following information:
- UTC Time
- Relative bearing
- Range to own ship
- Depth
Related functionality
- New Marker dialog box
Use this functionality if you need to create a marker based on geographical information from an external source. You can place markers on for example wrecks, obstacles on the seabed or coral reefs. For each new marker you must provide:
- Longitude
- Latitude
- Depth
- Position Input Format
When the new marker is created, it is automatically assigned a unique identifier (UID) by the ST90 system.
- Messages dialog box
The Messages dialog box allows you to read and acknowledge the messages.
Select Messages on the top bar to open the dialog box. When the ST90 system generates a new message, Messages on the top bar flashes. The colour reflects the severity of the most severe message. If you place the cursor over Messages, you will see a short list of the current messages.