Marker Output page
Use the Output Marker page to export target markers to a communication port. Each marker is identified with its geographical location. This marker location can be very useful for other instruments. For example, you can export this information to a chart plotter.
Prerequisites
The Output dialog box is not available when your ST90 system is set to Inactive mode.
How to open
This page is located in the Output dialog box. To open, select it on the Operation menu.

Description
Under normal use, the ST90 system presents several different echoes simultaneously. Some of these are clearly more interesting than others. It can be a challenging task to tell these echoes apart. It can also be hard to keep track of the different echoes as both echoes and your own vessel move. To ease the identification of these echoes you can use markers. Each marker is identified with its geographical location. If you have placed markers on several echoes to make them objects, you can select one of these and give it priority status.
In this context, the phrase marker is used to identify a visual symbol placed in the display presentation. A marker is thus a graphical indicator used to identify and highlight specific locations or objects. Placing a marker on an echo identifies the echo as "interesting". It is regarded as an object that you can act upon.
Further classification of this echo as a target must be done manually.
You can configure your ST90 system to export marker information. You must choose a suitable output port and select which datagram formats to export.
Select the output type from the list, and then where to save the files. Select Add to save your choices.
Once an output type has been defined, it is listed under Installed Outputs on the left side of the page. Under Installed Outputs, select any output to edit it or remove it. Select Edit to change the settings. Select Remove to delete the output.
Details
- Installed Outputs
All the outputs you have defined are listed under Installed Outputs. Under Installed Outputs, select any output to edit it or remove it.
- Select Remove to delete the output.
- Select Edit to change the settings.
- Select New to add an output.
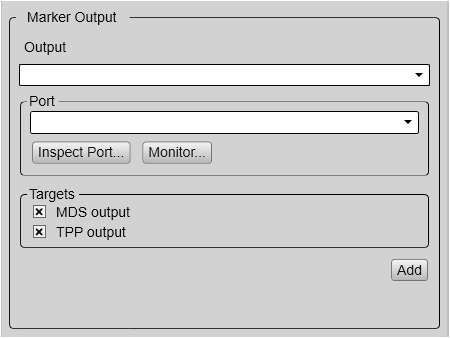
- Output
Select which marker type to export.
- Port
Select the Ethernet port or serial port you want to use for the communication.
- Inspect Port
Select Inspect Port to check the communication parameters for the port. The relevant port setup dialog box opens. You are not permitted to make any changes.
You cannot define the communication port parameters here. If you need to adjust these, you must select I/O Setup after you have defined the data output parameters. The I/O Setup page is located in the Installation and Output dialog boxes.
- Monitor
Select Monitor to open the Port Monitor dialog box. The Port Monitor dialog box allows you to study the communication stream on the chosen serial line or local area network (LAN) port.
- Targets
Select which datagram format(s) to export.
- MDS (Measured Data Shoal)
Simrad MDS is a proprietary datagram format created by Kongsberg Discovery. It contains the location, bearing and depth of a tracked target. All information is presented relative to your own vessel. All data are related to the tracked target.
- TPP (Tracked Target Position)
Simrad TPP is a proprietary datagram format created by Kongsberg Discovery. It exports the horizontal range, bearing and depth of a tracked target. All data are related to the tracked target.
- Add
Select Add to allow export of the chosen data format. Once an output type has been defined, it is listed under Installed Outputs on the left side of the page. To start data recording, open the Record Processed button, and select On. Alternatively, simply select the red circle on the right side of the button.
- Remove
Once an output type has been defined, it is listed under Installed Outputs on the left side of the page. To remove the output, select the relevant format under Installed Outputs, then select Remove.
- Edit
Once an output type has been defined, it is listed under Installed Outputs on the left side of the page. To change the output settings, select the relevant format under Installed Outputs, then select Edit. Select Save to keep the changes you have made.
- Save
Select Save to keep the changes you have made.